
.App Mesh and ECS with shared Meshes
What is App Mesh?
AWS App Mesh is a service mesh based on the Envoy proxy that makes it easy to monitor and control services. App Mesh standardizes how your services communicate, giving you end-to-end visibility and helping to ensure high availability for your applications. App Mesh gives you consistent visibility and network traffic controls for every service in an application. As well as supporting canary deployment of new versions (switching a percentage of traffic to the newer version deployed)
App Mesh Components:
Service mesh – A service mesh is a logical boundary for network traffic between the services that reside within it.
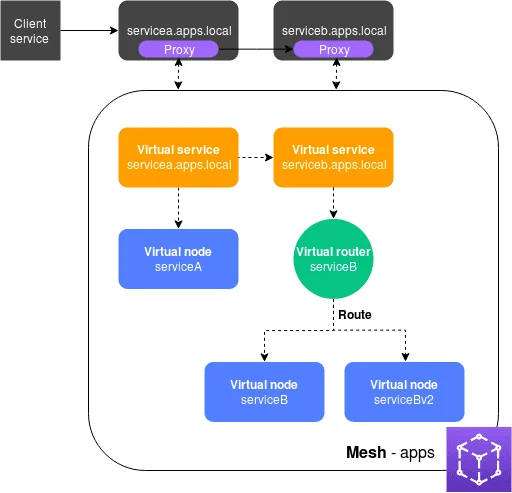
Virtual services – A virtual service is an abstraction of an actual service that is provided by a virtual node, directly or indirectly, by means of a virtual router. The names of the virtual services are the discoverable names of the actual services. When a virtual service and an actual service have the same name, multiple services can communicate with each other using the same names that they used before App Mesh was implemented.
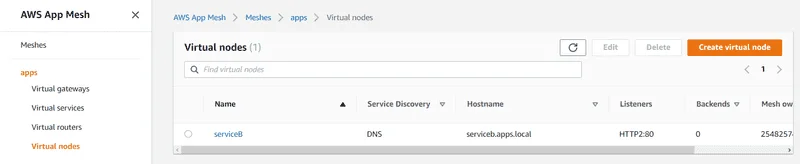
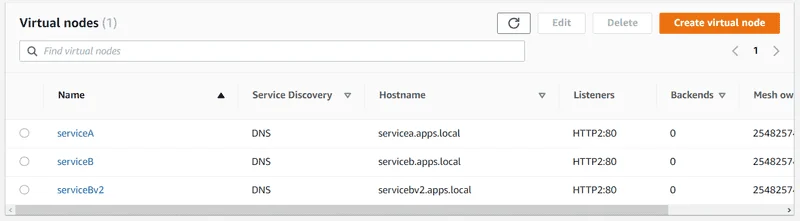
Virtual nodes – A virtual node acts as a logical pointer to a discoverable service, such as an Amazon ECS or Kubernetes service. For each virtual service, you will have at least one virtual node. In the illustration, the servicea.apps.local virtual service gets configuration information for the virtual node named serviceA. The serviceA virtual node is configured with the servicea.apps.local name for service discovery. The serviceb.apps.local virtual service is configured to route traffic to the serviceB and serviceBv2 virtual nodes through a virtual router named serviceB.
Virtual routers and routes – Virtual routers handle traffic for one or more virtual services within your mesh. A route is associated to a virtual router. The route is used to match requests for the virtual router and to distribute traffic to its associated virtual nodes. In the illustration, the serviceB virtual router has a route that directs a percentage of traffic to the serviceB virtual node, and a percentage of traffic to the serviceBv2 virtual node. You can set the percentage of traffic routed to a virtual node and change it over time. You can route traffic based on criteria such as HTTP headers, URL paths, or gRPC service and method names. You can configure retry policies to retry a connection if there is an error in the response. For example, in the illustration, the retry policy for the route can specify that a connection to serviceb.apps.local is retried five times, with ten seconds between retry attempts, if serviceb.apps.local returns specific types of errors.
Proxy – You configure your services to use the proxy after you create your mesh and its resources. The proxy reads the App Mesh configuration and directs traffic appropriately. In the illustration, all communication from servicea.apps.local to serviceb.apps.local goes through the proxy deployed with each service. The services communicate with each other using the same service discovery names that they used before introducing App Mesh. Because the proxy reads the App Mesh configuration, you can control how the two services communicate with each other. When you want to change the App Mesh configuration, you don't need to change or redeploy the services themselves or the proxies.
Somethings you should know about App Mesh:
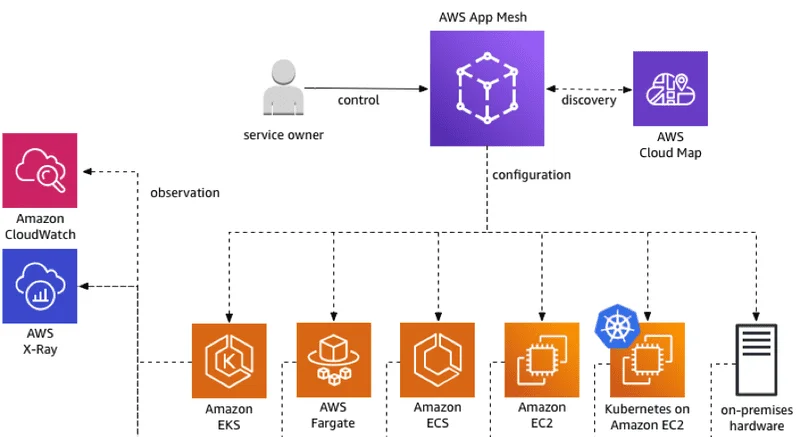
- App Mesh supports Linux services that are registered with DNS, AWS Cloud Map, or both.
- Integrates well with Amazon CloudWatch and Amazon X-Ray.
- Integrates with on premise Hardware, AWS Fargate, Amazon ECS, Amazon EKS, Amazon EC2, and Kubernetes on EC2
App Mesh Requires Envoy
- Deploy the application (Amazon EC2, Amazon ECS, Amazon EKS, etc.)
- Include Envoy as part of the application
- Reference the ARN of this service in the deployment
- AWS AppMesh Road Map for every new update: https://github.com/aws/aws-app-mesh-roadmap/projects/1
For the sake of this tutorial, we will adopt a conventional name of serviceA, serviceB, and serviceBv2 for the services and all the services are discoverable through a namespace named apps.local
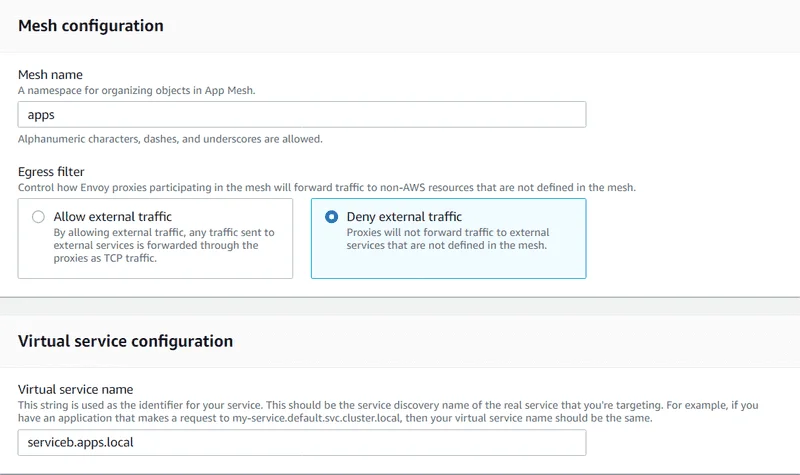
Step 1: Create a mesh and virtual service
- Open the App Mesh console first-run wizard .
- For Mesh name , enter apps.
- For Virtual service name , enter serviceb.apps.local.
- To continue, choose Next.
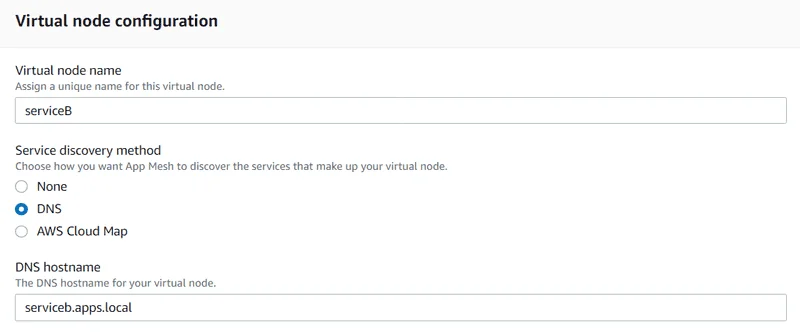
Step 2: Create a virtual node
- For Virtual node name , enter serviceB.
- For Service discovery method , choose DNS and enter serviceb.apps.local for DNS hostname.
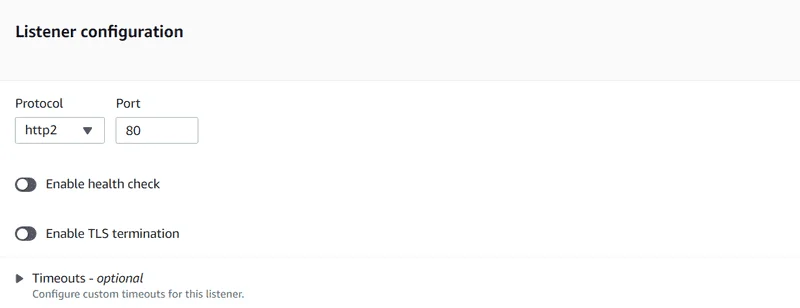
- Under Listener configuration , choose http2 for Protocol and enter 80 for Port.
- To continue, choose Next.
Step 3: Create a virtual router and route
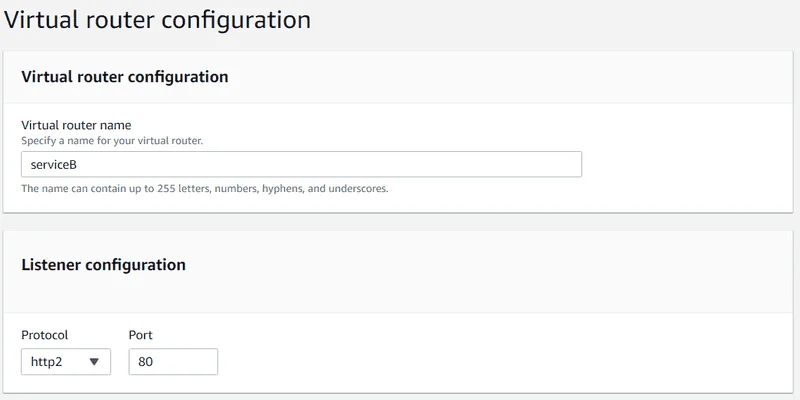
- For Virtual router name, enter serviceB.
- Under Listener configuration , choose http2 for Protocol and specify 80 for Port.
- For Route name , enter serviceB.
- For Route type , choose http2.
- For Virtual node name under Route configuration , select serviceB and enter 100 for Weight.
- To continue, choose Next

Step 4: Review and create
Choose Edit if you need to make changes in any section. Once you are satisfied with the settings, choose Create mesh.
The Status screen shows you all of the mesh resources that were created. You can see the created resources in the console by selecting View mesh.
Step 5 : Create additional resources
- In the left navigation pane, select Meshes

2. Select the apps mesh that you created in a previous step.
3. In the left navigation pane, select Virtual nodes
4. Choose Create virtual node.
5. For Virtual node name , enter serviceBv2 , for Service discovery method , choose DNS , and for DNS hostname , enter servicebv2.apps.local.
6. For Listener configuration , select http2 for Protocol and enter 80 for Port.
7. Choose Create virtual node.
8. Choose Create virtual node again. Enter serviceA for the Virtual node name. For Service discovery method , choose DNS , and for DNS hostname , enter servicea.apps.local.
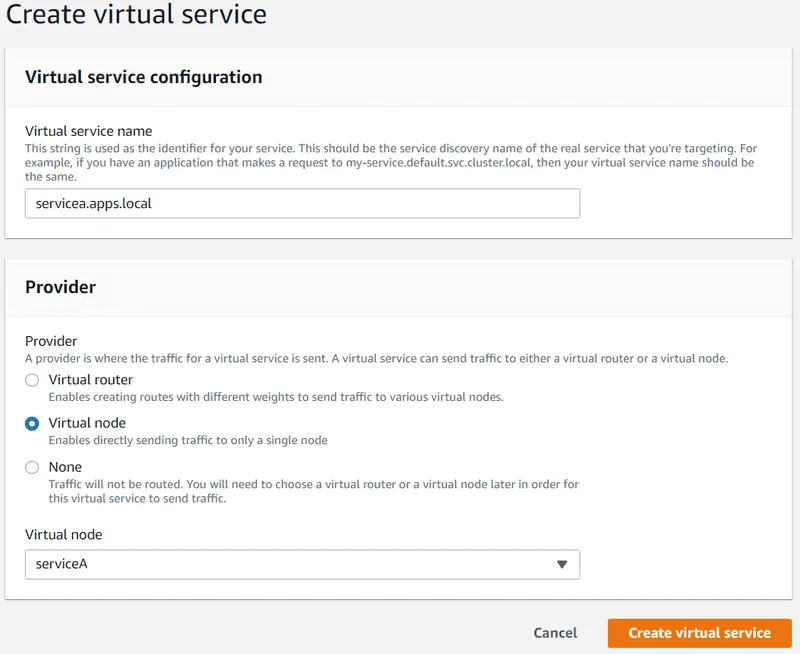
9. For Enter a virtual service name under New backend , enter servicea.apps.local.
10. Under Listener configuration , choose http2 for Protocol , enter 80 for Port , and then choose Create virtual node
11. In the left navigation pane, select ** Virtual routers** and then select the serviceB virtual router from the list.
12. Under Routes , select the route named ServiceB that you created in a previous step, and choose Edit.
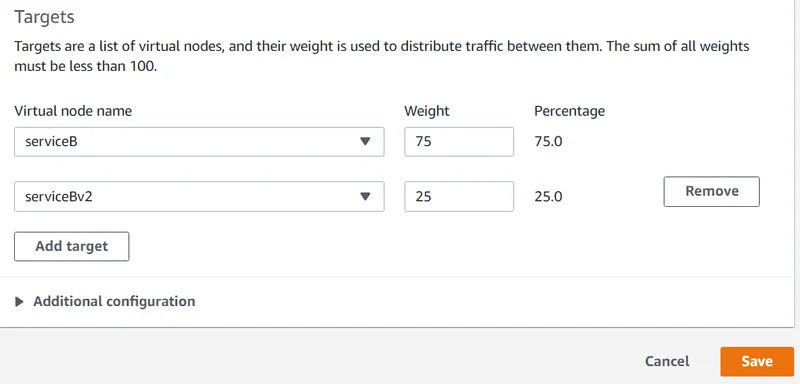
13. Under Targets , Virtual node name , change the value of Weight for serviceB to 75.
14. Choose Add target , choose serviceBv2 from the drop-down list, and set the value of Weight to 25.
15. Choose Save
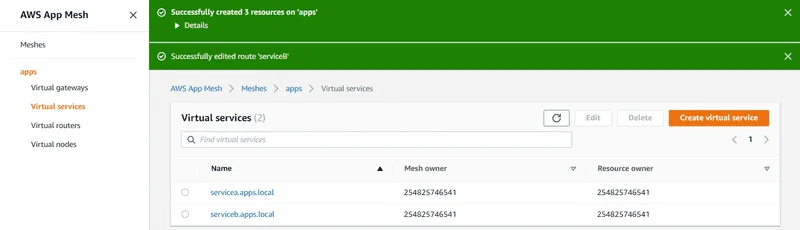
16. In the left navigation pane, select ** Virtual services** and then choose Create virtual service.
17. Enter servicea.apps.local for Virtual service name , select Virtual node for Provider , select serviceA for Virtual node , and then choose Create virtual service.
Step 6: Update services
You can do them Manually:
After creating your mesh, you need to complete the following tasks:
- Authorize the Envoy proxy that you deploy with each Amazon ECS task to read the configuration of one or more virtual nodes.
- Create IAM Policy : If you want to limit the mesh endpoints that configuration can be read from by individual mesh endpoints, then you need to create one or more IAM policies.You can create multiple policies, with each policy restricting access to different mesh endpoints.
If you want all mesh endpoints in a service mesh to be able to read the configuration for all mesh endpoints, then skip to Create IAM Role.
{
  "Version": "2012-10-17",
  "Statement": [
    {
    "Effect": "Allow",
    "Action": "appmesh:StreamAggregatedResources",
    "Resource": [
      "arn:aws:appmesh:us-east-1:123456789012:mesh/app1/virtualNode/serviceB",
      "arn:aws:appmesh:us-east-1:123456789012:mesh/app1/virtualNode/serviceBv2"
    ]
    }
  ]
}
OR Create IAM role: If you want all mesh endpoints in a service mesh to be able to read the configuration for all mesh endpoints, then you only need to create one IAM role. If you want to limit the mesh endpoints that configuration can be read from by individual mesh endpoints, then you need to create a role for each policy that you created in the previous step
- Select AWS service, select Elastic Container Service , and then select the Elastic Container Service Task use case when creating your IAM role.
- Attach IAM policy : If you want all mesh endpoints in a service mesh to be able to read the configuration for all mesh endpoints, then attach the AWSAppMeshEnvoyAccess managed IAM policy to the IAM role that you created in a previous step. If you want to limit the mesh endpoints that configuration can be read from by individual mesh endpoints, then attach each policy that you created to each role that you created.
- Attach IAM Role : Attach an Amazon ECS Task Role to the task definition that includes the Envoy proxy.
- Confirm Permission :
- From the Amazon ECS console, choose Task Definitions.
- Select your Amazon ECS task.
- On the Task Definition Name page, select your task definition.
- On the Task Definition page, select the link of the IAM role name that is to the right of Task Role. If an IAM role isn't listed, then you need to create an IAM role and attach it to your task by updating your task definition.
- In the Summary page, on the Permissions tab, confirm that either the custom policy you created previously, or the AWSAppMeshEnvoyAccess managed policy is listed. If neither policy is attached, attach an IAM policy to the IAM role. If you want to attach a custom IAM policy but don't have one, then you need to create the custom IAM policy. If a custom IAM policy is attached, select the policy and confirm that it contains "Action": "appmesh:StreamAggregatedResources". If it does not, then you need to add that permission to your custom IAM policy. You can also confirm that the appropriate Amazon Resource Name (ARN) for a specific mesh endpoints is listed. If no ARNs are listed, then you can edit the policy to add, remove, or change the listed ARNs.
- Repeat the previous steps for each task definition that contains the Envoy proxy.
- Update each of your existing Amazon ECS task definitions to use the Envoy proxy.
Or:
- Open the Amazon the Amazon ECS console.
- From the navigation bar, choose the Region that contains your task definition.
- In the navigation pane, choose Task Definitions.
- On the Task Definitions page, select the box to the left of the task definition to revise. From the pre-requisites and previous steps, you might have task definitions named taskA, taskB, and taskBv2. Select taskB and choose Create new revision.
- On the Create new revision of Task Definition page, make the following changes to enable App Mesh integration.
For Service Integration , to configure the parameters for App Mesh integration choose Enable App Mesh integration and then do the following:
- For Application container name , choose the container name to use for the App Mesh application. This container must already be defined within the task definition.
- For Envoy image , complete the following task and enter the value that is returned.
All supported Regions other than me-south-1 and ap-east-1. You can replace us-west-2 with any Region other than me-south-1 and ap-east-1.
840364872350.dkr.ecr.region-code.amazonaws.com/aws-appmesh-envoy:v1.12.5.0-prod
me-south-1 Region:
772975370895.dkr.ecr.me-south-1.amazonaws.com/aws-appmesh-envoy:v1.12.5.0-prod
ap-east-1 Region:
856666278305.dkr.ecr.ap-east-1.amazonaws.com/aws-appmesh-envoy:v1.12.5.0-prod
- For Mesh name , choose the App Mesh service mesh to use. In this topic, the name of the mesh that was created is apps.
- For Virtual node name , choose the App Mesh virtual node to use. For example, for the taskB task, you would choose the serviceB virtual node that you created in a previous step.
- The value for Virtual node port is pre-populated with the listener port that you specified when you created the virtual node.
- Choose Apply , and then choose Confirm. A new Envoy proxy container is created and added to the task definition, and the settings to support the container are also created. The Envoy proxy container then pre-populates the App Mesh Proxy Configuration settings for the next step.
- For Proxy Configuration , verify all of the pre-populated values.
- For Network Mode , ensure that awsvpc is selected.
- Choose Create.
- Update your service with the updated task definition.
Step 7: Sharing Resources
- For sharing resources inside your AWS Organizations
What you need to know about Sharing with AWS Organizations:
- Only the master account can enable sharing with AWS Organizations.
- The organization must be enabled for all features.
- If you do not enable sharing with AWS Organizations, you cannot share resources with your organization or organizational units within your organization. However, you can still share resources with individual AWS accounts in your organization. In this case, the accounts are treated as external principals. They receive an invitation to join the resource share, and they must accept the invitation to get access to the shared resources.
- You must share using the AWS RAM or the CLI command
- If you are part of an organization in AWS Organizations and sharing within your organization is enabled, principals in your organization are automatically granted access to the shared resources. Otherwise, principals receive an invitation to join the resource share and are granted access to the shared resources after accepting the invitation.
- After you add an organization to a resource share, changes to the OU or organization affect the resource share. For example, if you add a new account to the organization, it has access to the shared resources.
- You can't add the following to a resource share as principals: IAM users, IAM roles, or OUs or organizations outside your organization in AWS Organizations.
To enable sharing with AWS Organizations
- Open the Settings page of the AWS RAM console.
- Choose Enable sharing with AWS Organizations.
- To create a resource share (console)
- Open the AWS RAM console.
- If you are new to AWS RAM, choose Create a resource share from the home page. Otherwise, choose Create resource share from the Resource shares page.
- Under Description , for Name , type a descriptive name for the resource share.
- (Optional) Under Resources , select resources to add to the resource share as follows:
- or Select resource type , select the type of resource. This filters the list of shareable resources to resources of the selected type.
- Select the check boxes next to the resources. The selected resources are moved under Selected resources. If you are sharing zonal resources, using the Availability Zone ID (AZ ID) helps you determine the relative location of these resources across accounts.
- (Optional) Under Principals , do the following:
- By default, you can share resources with any AWS account. To restrict resource sharing to your organization in AWS Organizations, clear Allow external accounts.
- For each principal, specify its ID and choose Add :
- To add an AWS account, type the 12-digit account ID. For example, 123456789012.
- To add an OU, type the ID of the OU. For example, ou-abcd1234-mnop5678qrst9098uv76.
- To add your entire organization, type the ID of the organization. For example, o-abcd1234efgh5678.
- (Optional) Under Tags , type a tag key and tag value. To add another tag, choose Add tag and type a tag key and tag value pair. These tags are not applied to the resources included in the resource share.
- Choose Create resource share. It can take a few minutes for the resource and principal associations to complete. Allow this process to complete before attempting to use the resource share.
- You can add and remove resources and principals or apply custom tags to your resource share at any time. You can delete your resource share when you no longer want to share the resources.
- To create resource share (AWS CLI) Use the create-resource-share command.


We use cookies on our website. Some of them are essential,while others help us to improve our online offer.
You can find more information in our Privacy policy