
.Digging Deeper: Smart AWS Alerts with EventBridge and Q Developer
Introduction
Both during initial development and in production, comprehensive monitoring and alerting is crucial for developer and customer visibility into the health of a system. AWS Q Developer (formerly known as AWS Chatbot) provides a convenient way to receive alerts in Slack, Teams or Chime.
In this blog post, we will explore
- how Q Developer can be configured to receive alerts from AWS services,
- how to use EventBridge Input Transformers to enrich these alerts,
- how to use Q Developer Custom Notifications to create custom alerts,
- and how to use Lambda to further enrich the event data and render it into a
custom notification format.
Q Developer
Q Developer can be configured to receive alerts from a variety of AWS services, including CloudWatch Alarms, EventBridge events, and more. For many of these alerts, it has sane (but opinionated) defaults, rendering them into actionable alerts including links to resources or metrics graphs.
However, there are cases where the default rendering is not sufficient. Take, for example, this EventBridge event that is sent when on a console signin event (taken from the AWS documentation):
{
  "version": "0",
  "id": "6f87d04b-9f74-4f04-a780-7acf4b0a9b38",
  "detail-type": "AWS Console Sign In via CloudTrail",
  "source": "aws.signin",
  "account": "123456789012",
  "time": "2016-01-05T18:21:27Z",
  "region": "us-east-1",
  "resources": [],
  "detail": {
    "eventVersion": "1.02",
    "userIdentity": {
      "type": "Root",
      "principalId": "123456789012",
      "arn": "arn:aws:iam::123456789012:root",
      "accountId": "123456789012"
    },
    "eventTime": "2016-01-05T18:21:27Z",
    "eventSource": "signin.amazonaws.com",
    "eventName": "ConsoleLogin",
    "awsRegion": "us-east-1",
    "sourceIPAddress": "0.0.0.0",
    "userAgent": "Mozilla/5.0 (Macintosh; Intel Mac OS X 10_10_5) AppleWebKit/537.36 (KHTML, like Gecko) Chrome/47.0.2526.106 Safari/537.36",
    "requestParameters": null,
    "responseElements": {
      "ConsoleLogin": "Success"
    },
    "additionalEventData": {
      "LoginTo": "https://console.aws.amazon.com/console/home?state=hashArgs%23&isauthcode=true",
      "MobileVersion": "No",
      "MFAUsed": "No"
    },
    "eventID": "324731c0-64b3-4421-b552-dfc3c27df4f6",
    "eventType": "AwsConsoleSignIn"
  }
}
⚠️ Being able to match this event at all requires an EventBridge rule with CloudTrail events enabled.
Note how the $.detail.additionalEventData.MFAUsed field is set to No, which is a condition that we would like to alert on. We can capture the event using an EventBridge rule with the following pattern:
{
  "detail": {
    "additionalEventData": {
      "MFAUsed": [{
        "anything-but": ["Yes"]
      }]
    },
    "eventName": ["ConsoleLogin"],
    "responseElements": {
      "ConsoleLogin": ["Success"]
    }
  },
  "detail-type": ["AWS Console Sign In via CloudTrail"]
}
EventBridge is then configured to send the event to an SNS topic which Q Developer is subscribed to. If Q Developer is authenticated to a Slack workspace and channel, it will render the following message:
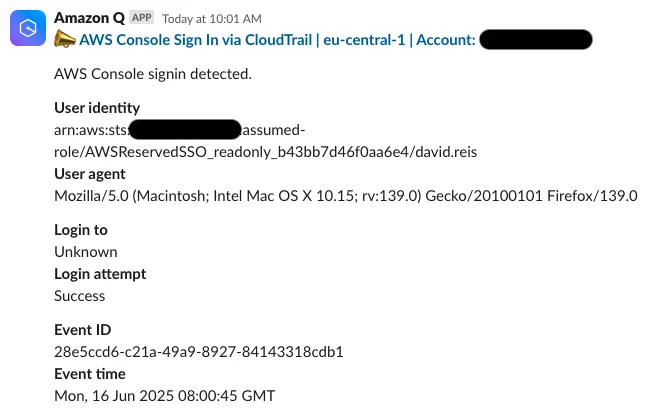
This is not very useful. We only see that a generic console signin occurred, but the human intent of the alert is lost. Much of the original data present in the EventBridge event is also not rendered, and - although censored here - the account being represented as an ID increases mental overhead when trying to understand the context.
Input Transformers
To address this, we can start working with EventBridge Input Transformers. Input Transformers allow us to define JSON paths in the source event and re-use the values in the transformed event.
An example of an Input Transformer path extractor that captures all fields from the source event above would be the following:
{
  "account": "$.account",
  "detail-type": "$.detail-type",
  "detailAdditionalEventDataLoginTo": "$.detail.additionalEventData.LoginTo",
  "detailAdditionalEventDataMFAUsed": "$.detail.additionalEventData.MFAUsed",
  "detailAdditionalEventDataMobileVersion": "$.detail.additionalEventData.MobileVersion",
  "detailAwsRegion": "$.detail.awsRegion",
  "detailEventID": "$.detail.eventID",
  "detailEventName": "$.detail.eventName",
  "detailEventSource": "$.detail.eventSource",
  "comment": "... and so on"
}
This simply extracts all fields from the source event and maps them to template variables named after their source path. The variables can then be used in the output template.
Due to the fact that Q Developer uses its internal message templates, the output must strictly match the expected EventBridge format. What exactly can be changed depends on the source and the exact event, so it is important to test the output in Q Developer and start with small changes.
An example output template would be:
{
  "version": "<version>",
  "id": "<id>",
  "detail-type": "<detail-type>",
  ... and so on for all fields, recreating the original event structure
  "resources": <resources>,
  "detail": {
    "eventVersion": "<detailEventVersion>",
    "userIdentity": {
      "type": "<detailUserIdentityType>",
      ...
    },
    ...
    "requestParameters": <detailRequestParameters>,
    "responseElements": {
      "ConsoleLogin": ":warning: No MFA :warning:"
    },
    ...
  }
}
ℹ️ Note that this is not JSON - the output template can copy entire data structures if variables are used without quotes.
This matches the input event almost exactly - with the exception of the responseElements.ConsoleLogin field, which is set to a warning message indicating that MFA was not used. When the offending user now logs into the console again, the alert will look like this:
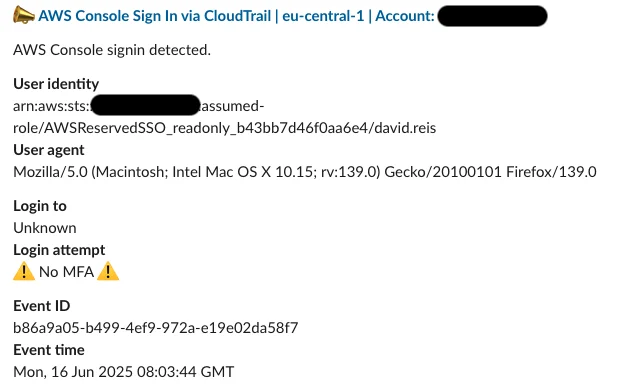
Success - the alert now clearly indicates that the user logged in without MFA.
But what if we now want to further customize the alert? For example, we might want to change the title in order to make the intent more visible:
{
   ...
   "detail-type": "<detail-type> - MFA not used",
   ...
}
This is the result:

The title did change - but the entire event context is lost! This happens because Q Developer uses the detail-type field to match and template the output message, and there is no match for our modified type.
ℹ️ Q Developer appears to do a prefix match here - I initially tried to demonstrate prepending an emoji, which caused the event to be lost entirely.
In a similar vein, notice how the $.resources and $.detail.requestParameters fields are unquoted in the input transformer. This is due to the fact that they are [] and null, respectively. The input transformer will fail to template the output if we access inside a null, so an any attempt to work with an event whose fields are e.g. typed as null | dict requires two separate rules with associated transformers, or only allow to replicate them verbatim as above.
So this approach has very strict limitations:
- We can only change specific fields
- The syntax to do so is verbose, noisy and error-prone
- The overhead for matching and rendering event varieties is high
- Adding or removing fields is not possible
- It quickly becomes unmanageable as more complex events are introduced.
And last but not least, automating the creation of such filters via Terraform in a maintainable, reusable and elegant way would be a nightmare.
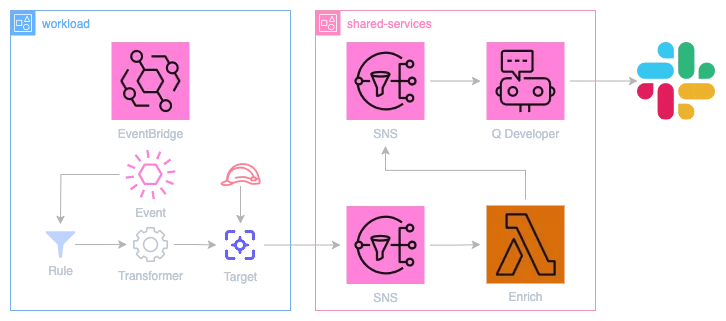
Using Lambda for enrichment
To address these limitations, we can leverage Q Developer Custom Notifications. Unlike predefined events, they allow full control over the output while still applying a light standardization and optionally exposing Q's advanced capabilities.
⚠️ Documentation in this area is unfortunately somewhat lacking, with several of the fields being unused or without clear effect.
To configure our custom notifications, we need to slightly abuse the Input Transformer mechanism: Instead of performing the transformation in EventBridge, it can also serve as a metadata storage. Metadata can be injected from Terraform directly and matched to your organization's needs.
The output can then be processed via Lambda. This introduces some overhead, but for low-volume events like alerts (with properly scoped rules), $0.10 per million alerts shouldn't break the bank. Thanks to IAM role support for EventBridge targets and cross-account SNS publishing, only a single Lambda function with low privilege or encryption requirements per organization is needed. The output formatting can then be controlled from this central location.
What we gain from the tradeoff is the ability to fully control and manipulate the event with custom logic. Replicating the transformer logic in Lambda is trivial, and regex extraction or conditional logic can easily be added to enrich the event further.
The path extractor can be simplified to this, capturing the entire event as a single variable:
{ "event": "$" }And the output template now moves the event one level down, adding the metadata as a separate object. How exactly the metadata is structured depends on your needs, so this is only an example:
{
    "event": <event>,
    "alert": {
        "title":"A user logged into {account} account without MFA enabled!",
        "summary":"No MFA",
        "severity":"high",
        "additional_context": {
            "awsRegion": "{awsRegion}",
            "eventName": "{eventName}",
            "eventSource": "{eventSource}",
            "eventTime": "{eventTime}",
            "sourceIPAddress": "{sourceIPAddress}",
            "userName": "{userName}"
        },
        "channel_ping": false,
        "description": "Multifactor authentication should be used.",
        "emoji": [":bust_in_silhouette:", ":no_mobile_phones:"],
        "enable_custom_actions": null,
        "event_type": "aws_api_call",
        "extract": {
            "arn": ["detail", "userIdentity", "arn"],
            "ssoUser": ["detail", "userIdentity", "arn"],
            "awsRegion": ["detail", "awsRegion"],
            "eventName": ["detail", "eventName"],
            "eventSource": ["detail", "eventSource"],
            "eventTime": ["detail", "eventTime"],
            "sourceIPAddress": ["detail", "sourceIPAddress"],
            "userName": ["detail",  "userIdentity", "sessionContext", "sessionIssuer", "userName"],
            "account": ["account"]
        },
        "extract_regex": {
            "ssoUser": "arn:aws:sts::[0-9]{12}:assumed-role/AWSReservedSSO.*/([a-zA-Z0-9-.]+)$"
        },
        "keywords": ["security", "mfa", "signin"],
        "next_steps": ["Investigate {userName} and {sourceIPAddress}"],
        "related_resources": ["{arn}"]
    }
}
ℹ️ The maximum length of an Input Transformer template is 8192 characters. The above is 955 characters (minimized), so this leaves ample room for further customization.
This template contains a lot of information (mainly to demonstrate the capabilities), but unlike the original template, all of it is meaningful and can be stored in the codebase. In our Landing Zone modules, one module is responsible for storing all alerting EventBridge rules with their (optional) associated transformation templates. Since only matched events incur costs, they can then be deployed via the account baseline to all accounts in the organization.
Processing
Describing the entire setup process for the Lambda function is beyond the scope of this blog post, but there are plenty of examples for SNS -> Lambda -> SNS processing available online. We recommend applying KMS CMK encryption to the SNS topics and the Lambda function since some events may contain sensitive data under GDPR or other privacy regulations.
The Lambda function itself is implemented in Python. It uses Pydantic to model the alert object and Q Developer inputs, and glom to extract the relevant fields from the event. (There are many other approaches to do so - for example, JMESPath / JSONPath / JSONata could be used for extraction and processing in the same step.)
The exact models being used are omitted here - they have to reflect the nesting and encoding AWS applies to the Lambda event inputs. You can elect to manually extract the data and then validate it - or use a bit of generic model magic:
def lambda_handler(trigger_event, context):
    for record in SnsEvent[SnsAlert].model_validate(trigger_event).Records:
        event = record.body.Message.event
alert = record.body.Message.alertℹ️SnsEventis a Pydantic model that matches the SNS event structure and parses the JSON, andSnsAlertis the content model for theMessagefield.
As per the input transformer template, event contains the entire EventBridge event (JSON-parsed as a Python dict), and alert conforms to the following Pydantic model:
class AlertConfig(BaseModel):
    """Model for an alert."""

    # Alert data
    severity: str
    channel_ping: bool
    emoji: list[str]
    extract: dict[str, list[str]] = Field(default_factory=dict)
    extract_omit_missing: bool = False
    extract_regex: dict[str, str] = Field(default_factory=dict)

    # Custom Q notification data
    title: str
    description: str
    summary: str | None = None
    next_steps: list[str] | None = None
    keywords: list[str] | None = None
    related_resources: list[str] | None = None
    additional_context: dict[str, str] | None = None
    event_type: str | None = None
    enable_custom_actions: bool | None = None
If the input transformer was configured automatically via Terraform (which also enforces strict typing and map structure), the alert object can be trusted to be valid.
ℹ️ The same chain can even be used to emit and process entirely custom notifications. To do so, share the Pydantic model between Lambdas with an organization-wide model layer, then publish to the SNS topic manually. This allows us to apply consistent output formatting across all custom notifications.
The model can now be used to process the alert. Note how glom is used to address the paths in the extract field.
def _extract(event: dict[str, Any], alert: AlertConfig) -> dict[str, str]:
    extracted: dict[str, str] = {}
    for key, path in alert.extract.items():
        try:
            extracted[key] = str(glom(event, '.'.join(path)))
        except (KeyError, PathAccessError):
            log.warning('extract path not found', extra={'path': path})
            continue
        except Exception:
            log.exception('error extracting path', extra={'path': path})
            continue
    log.debug('extracted data', extra={'extracted': extracted})
    return extracted


def _extract_regex(extracted: dict[str, str], alert: AlertConfig) -> dict[str, str]:
    for key, regex in alert.extract_regex.items():
        if key not in extracted:
            continue
        field = extracted[key]
        match = re.search(regex, field)
        if not match:
            log.warning(
                'extract regex not found',
                extra={'regex': regex, 'field': field}
            )
            _ = extracted.pop(key, None)
            continue
        if len(match.groups()) != 1:
            log.error(
                'unexpected multigroup regex',
                extra={'regex': regex, 'field': field}
            )
            _ = extracted.pop(key, None)
            continue
        extracted[key] = match.group(1)
    log.debug('regex extracted data', extra={'extracted': extracted})
    return extracted
And in the function handler:
extracted = _extract(event, alert)
extracted = _extract_regex(extracted, alert)
This gives us a dictionary containing extracted fields - just like the Input Transformer itself would have done -, as well as the option to apply regex to the fields and change them in-place. Introducing additional logic would then follow the same pattern, so the Lambda function is easily extensible.
For rendering the output, AWS has helpfully published an OpenAPI schema. It can be translated to a Pydantic model (CustomNotifications) using datamodel-code-generator.
How exactly you want to structure the output message is again up to you. Keep in mind that Slack and Teams have somewhat different requirements and capabilities, so if you need to support both, you are limited to the lowest common denominator.
We can now implement a renderer for the output model (abbreviated for clarity):
class Renderer:
    """Renderer for custom notifications."""

    def __init__(self, event: dict[str, Any], extracted: dict[str, str], alert: AlertConfig):
        """Prepare the renderer with the event, extracted data, and alert configuration."""
        self.event = event
        self.alert = alert
        self._extracted = {k: f'`{v}`' if _is_technical(v) else v for k, v in extracted.items()}
        self.default_values = defaultdict(lambda: MISSING_TEXT, self._extracted)

    # ... overloads
    def _template(self, tpl: str | None) -> str | None:
        if tpl is None:
            return None
        try:
            return tpl.format_map(self.default_values)
        except Exception:
            return tpl

    # ... overloads
    def _template_collection(
        self, c: dict[str, str] | list[str] | None
    ) -> dict[str, str] | list[str] | None:
        if c is None:
            return None
        if isinstance(c, dict):
            return {self._template(k): self._template(v) for k, v in c.items()}
        return [self._template(v) for v in c]

    def _build_description(self, additional_context: dict[str, str]) -> str:
        body = '\n'.join(
            f'> *{field}*: {value}'
            for field, value in additional_context.items()
            if MISSING_TEXT not in value or not self.alert.extract_omit_missing
        )
        return self._template(self.alert.description) + '\n\n' + body

    # ... title builder using emoji and channel_ping
    # ... render() inserting the data into the output model
⚠️ additional_context is currently unused by Q Developer, so we use it to add context to the description. This may change in the future.This renderer is then used in the Lambda handler to produce the final output:
extracted = _extract_regex(extracted, alert)
renderer = Renderer(event, extracted, alert)
ret = renderer.render()
And finally, assuming that we have a mapping of severity to SNS topics (for alerting to different channels), we can publish the message to the appropriate SNS topic:
def _submit_notification(notification: CustomNotifications, severity: str) -> None:
    notification_json = notification.model_dump_json(
        indent=2,
        exclude_unset=True,
        exclude_none=True,
    )
    sns_topic_arn = SNS_TOPIC_ARNS[severity]
    log.debug(
        'publishing notification',
        extra={'notification': notification_json, 'sns_topic_arn': sns_topic_arn},
    )
    if PUBLISH:
        sns_client = boto3.client('sns')
        sns_client.publish(
            TopicArn=sns_topic_arn,
            Message=notification_json,
        )

_submit_notification(ret, alert.severity)
And that's it! Let's see what happens when the user logs in again:
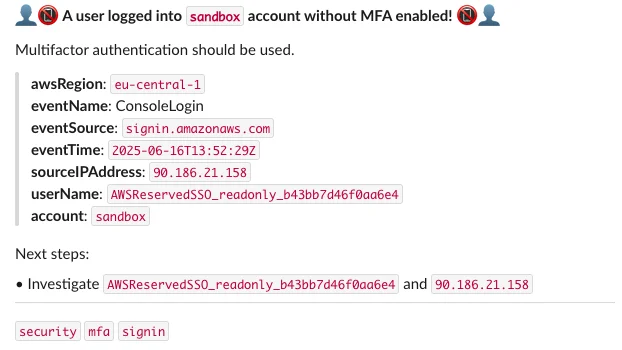
The alert now contains a rich description, a title that clearly indicates the intent, and a summary of the event. It also now includes the name of the account within the organization, as opposed to the account ID. This could, for example, be used in further refinement via conditional processing: set severity to critical if account == "management". The alert is actionable, and the user can immediately see what to do next.
Admittedly, it's not as pretty as the default rendering due to the limitations of Slack Markdown, so depending on your needs you may want to use e.g. tabulate to generate a code-formatted output table. You could even skip Q Developer entirely and create a simple Slack app that uses BlockKit to render rich messages.
Wrapping Up
Effective monitoring and actionable alerting are key to maintaining a secure, robust infrastructure. While AWS Q Developer's default alerts are convenient, customizing notifications with EventBridge Input Transformers and enriching them via Lambda can elevate your alerts from informative to genuinely actionable, reducing alert fatigue and improving response times.
The techniques demonstrated here - especially leveraging custom notifications and Lambda enrichment - aren’t just limited to security. They form a flexible framework you can apply across your entire infrastructure.
Invest in creating meaningful alerts today, and your team will spend less time deciphering generic messages, and more time proactively maintaining your environment's health.


We use cookies on our website. Some of them are essential,while others help us to improve our online offer.
You can find more information in our Privacy policy